Your Guide to How To Change a Light Fixture
What You Get:
Free Guide
Free, helpful information about How To Change and related How To Change a Light Fixture topics.
Helpful Information
Get clear and easy-to-understand details about How To Change a Light Fixture topics and resources.
Personalized Offers
Answer a few optional questions to receive offers or information related to How To Change. The survey is optional and not required to access your free guide.
Illuminate Your Home: A Step-by-Step Guide to Changing a Light Fixture
Changing a light fixture is one of those seemingly daunting tasks that, with a bit of knowledge and preparation, can turn into a weekend DIY triumph. Whether you want to update the style of a room, improve energy efficiency, or replace a broken fixture, this guide will walk you through the process with ease and confidence. Let's illuminate your path to a brighter space!
🌟 Why Change Your Light Fixture?
Before diving into the how-to, it's essential to understand why you might want to change a light fixture. Here are some compelling reasons:
- Aesthetic Upgrade: Outdated or mismatched fixtures can detract from your home's overall look. A new fixture can enhance your space's decor and create a more cohesive look.
- Energy Efficiency: Newer fixtures often support energy-saving bulbs, reducing your electricity bill and environmental footprint.
- Improved Functionality: A fixture that's poorly suited to a room's needs, such as inadequate light or an inconvenient switch location, warrants an upgrade.
- Safety Concerns: Flickering lights, buzzing, or signs of wear may indicate the need for a new, safer fixture.
🔧 Tools and Materials Needed
Gathering the right tools and materials before you begin will save you trips to the hardware store and help ensure a smooth process.
- Screwdrivers: Both flathead and Phillips are typically required.
- Voltage Tester: To confirm the power is off before you begin working.
- Wire Cutters/Strippers: Handy for trimming wire ends if needed.
- Ladder: Ensure it's sturdy and the correct height for your ceiling.
- New Light Fixture: Ensure it contains all necessary components for installation.
- Wire Nuts: Usually included with the fixture but buying extra is wise.
- Electrical Tape: For securing wires.
- Safety Glasses and Gloves: To protect against debris and injuries.
⚡️ Safety First: Cut the Power
Safety is paramount when working with electricity. Always begin by cutting the power.
- Turn Off the Circuit: Locate your home's circuit breaker and switch off the circuit connected to the light fixture.
- Test the Fixture: Use a voltage tester to ensure that no electricity is flowing to the fixture. Simply confirm with the tester at the wires once other appliances or lights in the circuit have been tested and turned off.
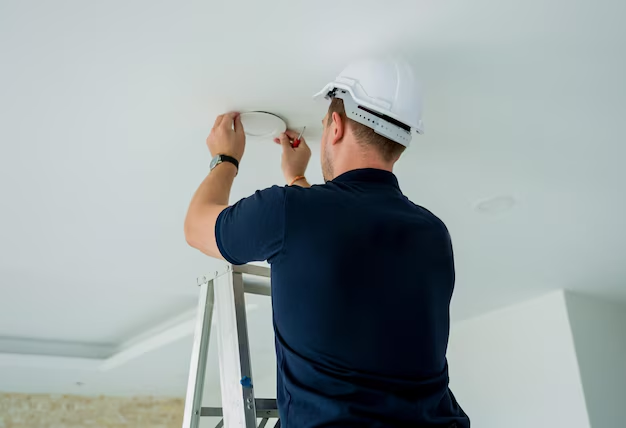
🛠 Dismantle the Old Fixture
Once the power is off, it's time to remove the existing fixture.
- Remove the Bulbs and Cover: Take out light bulbs and any glass covers for easier access.
- Detach the Fixture: Support the fixture with one hand while using the other to remove the screws connecting it to the ceiling or wall.
- Disconnect the Wires: Gently pull down the fixture to reveal the wires. Note wire colors (typically black, white, and a bare copper or green ground wire) and how they're connected. Loosen then remove the wire nuts and separate the wires.
- Free the Mounting Bracket: Unscrew the mounting bracket attached to the electrical box if necessary.
📦 Prepare the New Fixture
Setting up your new fixture for installation is straightforward, primarily ensuring all parts are ready and in place.
- Inspect Your New Fixture: Ensure all parts are included and undamaged.
- Assemble if Required: Some fixtures may require a quick assembly according to the manufacturer's instructions. Start now to avoid hassles while holding the fixture.
🧩 Install the New Fixture
It's now time to install your new light fixture. This part is easier than you might think!
- Connect the Wiring: Match wire colors from the fixture to those in the ceiling, typically connecting black to black, white to white, and the ground wire to a green screw or wire. Twist wire nuts onto each set of wires, then secure them with electrical tape.
- Secure the Fixture: Mount the fixture's base to the ceiling bracket using the screws provided. Use care to ensure it’s tightly in place to avoid any wobble.
- Attach Bulbs and Covers: Fasten any decorative covers, then install bulbs compatible with the fixture.
��� Test Your Work
With the new fixture installed, it's time to ensure all connections are secure and the fixture operates correctly.
- Restore Power: Switch the circuit breaker back on.
- Test the Fixture: Turn the light switch to observe if the fixture lights up as expected. If not, double-check wire connections and ensure they are secure.
🛡 Maintenance Tips to Extend Fixture Life
Now that you've changed your fixture, here are some tips to keep it shining brightly:
- Use Appropriate Bulbs: Check for the recommended wattage and type for your fixture.
- Regular Cleaning: Dust and clean your fixtures regularly to prevent wear and maintain light quality.
- Inspect for Damage: Periodically check for loose or damaged wires, especially after storms or power outages.
📝 Quick Recap
Here's a summary of the steps to changing a light fixture, complete with tips for a successful DIY project:
- 🔍 Plan and Inspect: Select a fixture that matches your room’s aesthetic and lighting needs.
- 🔧 Gather Tools: Ensure you have screwdrivers, a voltage tester, wire cutters, and other necessary tools.
- ⚡️ Cut Power: Safety requires shutting off the relevant circuit and confirming power is indeed off.
- 🛠 Remove Old Fixture: Carefully detach bulbs, covers, and mounting components.
- 📦 Prepare New Fixture: Inspect and assemble components as per instructions.
- 🧩 Install Safely: Connect wires, secure the fixture, and turn power back on to test.
- 🔍 Maintain Regularly: Keep bulbs fresh and fixtures clean for longevity.
Changing a light fixture can seem intimidating, but with the right approach and safety measures, it's a rewarding project that can enhance both the utility and style of your home. Remember to assess the condition of your fixtures periodically, making changes as needed to keep your spaces bright and welcoming. Happy DIYing!
What You Get:
Free How To Change Guide
Free, helpful information about How To Change a Light Fixture and related resources.

Helpful Information
Get clear, easy-to-understand details about How To Change a Light Fixture topics.

Optional Personalized Offers
Answer a few optional questions to see offers or information related to How To Change. Participation is not required to get your free guide.

Discover More
- How Can I Change Text Message To Imessage
- How Can You Change a Jpeg To a Pdf
- How Do I Change a Jpeg To a Pdf
- How Do I Change a Pdf To a Jpg
- How Do I Change a Pdf To a Word Document
- How Do I Change a Repeating Decimal To a Fraction
- How Do I Change a Text Message To An Imessage
- How Do I Change From Text To Imessage
- How Do I Change Lowercase To Uppercase In Word
- How Do I Change My Political Party To Independent