Replacing Your Shower Cartridge: A Step-by-Step Guide for a Smooth Bathing Experience 🚿
Transforming mundane home repairs into manageable tasks can be an empowering journey. One such common household project is changing a shower cartridge. Whether you're battling leaks, dealing with fluctuating water temperatures, or rejuvenating an old system, this guide will provide the comprehensive insight needed to get the job done effectively.
Understanding the Role of the Shower Cartridge
Your shower cartridge plays a pivotal role in controlling water flow and temperature, acting as the heart of your shower system. Typically found behind the handle of the shower controls, the cartridge blends hot and cold water according to your settings, ensuring a steady flow. Over time, however, this component can wear out, leading to leaks, drops in water pressure, or erratic temperature changes.
Common Signs You Need a Cartridge Replacement
Before jumping into the replacement process, it's crucial to recognize the signs that indicate a failing cartridge:
- Water Leaks: Persistent drips even when the shower is turned off.
- Temperature Fluctuations: Sudden shifts in water temperature.
- Reduced Water Pressure: Noticeably lower water intensity.
If your shower exhibits these symptoms, replacing the cartridge can restore its functionality and efficiency.
Preparing for the Replacement: Tools and Steps
Preparation sets the stage for a smooth replacement process. Make sure you have everything you need before beginning to dismantle your shower.
Essential Tools and Materials
Here's a handy list of tools typically needed for a shower cartridge replacement:
- Screwdriver (Phillips and flathead)
- Allen wrench set
- Adjustable wrench or pliers
- Plumber’s grease
- Towel or sponge
- Replacement cartridge (ensure it's compatible with your shower model)
- Bucket or small container
With your tools assembled, you're ready to tackle the task ahead.
Safety First: Turn Off the Water Supply
Safety is paramount. Start by turning off your shower's water supply to avoid unwanted water spills. Locate the main water valve and turn it clockwise until it's fully closed. If this step is missed, you could end up creating a mini indoor waterfall, which is best avoided.
Step-by-Step Guide: Replacing the Shower Cartridge
Now, let's embark on the replacement journey, dissecting the process into digestible, manageable steps.
Step 1: Remove the Shower Handle
Begin by removing the shower handle. This typically involves unscrewing the small screw located at the handle's base. A screwdriver or an Allen wrench may be required, depending on your shower model.
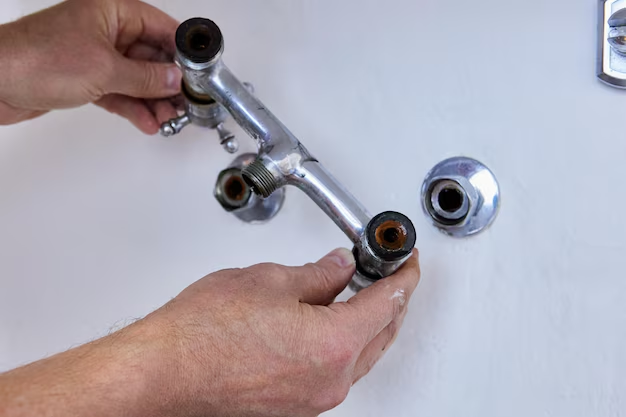
Step 2: Access the Cartridge
Once the handle is removed, you'll see a trim plate held in place by screws. Carefully unscrew and remove this plate, setting it aside for later reassembly. Now, you'll have access to the cartridge housed within.
Step 3: Take Out the Old Cartridge
Use an adjustable wrench or pliers to grip the old cartridge, gently pulling it out. If it resists, applying a bit of elbow grease or using a cartridge puller specific to your model may help.
🔧 Tip: Take note of how the old cartridge is positioned. Installing the new one in the same orientation is critical for proper operation.
Step 4: Install the New Cartridge
With the old cartridge out, it's time to insert the new one. Apply plumber's grease to the O-rings of the new cartridge for a smoother installation and better seal.
Slide it into place, ensuring the notches align with those in the housing. Secure it by tightening it with a wrench or pliers, again ensuring alignment is correct.
Step 5: Reassemble the Shower Components
Reattach the trim plate and tighten it with the screws you previously removed. Then, reinstall the shower handle, securing it with its screw.
Step 6: Restore the Water Supply and Test
Once everything is reassembled, turn the water supply back on. Test the new installation by running the shower, checking for any leaks or temperature issues.
🔍 Pro Tip: Take a moment to run both hot and cold water through the system to ensure the new cartridge regulates temperature properly.
Maintaining Your Shower for Longevity
Proper maintenance is key to prolonging the life of your shower components. Implement these practices to keep your shower in top shape long after replacing the cartridge:
- Regular Cleaning: Clean the showerhead and handle area to prevent mineral build-up.
- Inspect and Replace: Periodically check the faucet and connections for wear and leaks.
- Use Filters: Consider using water softeners or filters to minimize mineral deposits that can degrade the cartridge.
DIY or Professional Help: Choosing the Right Path
Changing a shower cartridge can be a DIY-friendly task, but it might not be everyone's cup of tea. While many enjoy the satisfaction of a job well done, others prefer professional intervention. Here's when professional assistance may be warranted:
- Highly Complex Systems: Modern shower systems with multiple functions may require expert knowledge.
- Persistent Issues: If problems persist post-replacement, a professional can diagnose and rectify deeper issues.
- Time Constraints: Busy schedules might necessitate professional services to save time and ensure efficiency.
Quick Summary: Key Takeaways for a Flawless Shower Experience 🌟
Here's a recap of the essential steps and tips for changing your shower cartridge:
- Identify Symptoms: Leaks, temperature issues, or pressure drops signal replacement needs.
- Gather Tools: Prepare the necessary tools and replacement cartridge.
- Turn Off Water: Ensure safety by shutting off the water supply.
- Remove & Replace: Carefully disassemble, replace the cartridge, and reassemble.
- Test Thoroughly: Check for leaks and proper temperature regulation post-installation.
- Regular Maintenance: Maintain cleanliness and inspect periodically for maximum lifespan.
By following this guide, you can confidently tackle the process of changing a shower cartridge, enhancing your shower's performance and bringing comfort back to your daily routine. Whether you undertake this as a DIY project or seek professional help, understanding each step empowers you to make informed decisions for your home.
Eager to reclaim your shower's optimal functionality? Gather your tools, take a deep breath, and dive into the rewarding experience of do-it-yourself home care. Happy fixing! 🛠️
Related Topics
- How Can I Change Text Message To Imessage
- How Can You Change a Jpeg To a Pdf
- How Do I Change a Jpeg To a Pdf
- How Do I Change a Pdf To a Jpg
- How Do I Change a Pdf To a Word Document
- How Do I Change a Repeating Decimal To a Fraction
- How Do I Change a Text Message To An Imessage
- How Do I Change From Text To Imessage
- How Do I Change Lowercase To Uppercase In Word
- How Do I Change My Political Party To Independent
