Mastering the Art of Toilet Flange Replacement: A Step-by-Step Guide
Feeling like your toilet is a ticking time bomb? While it might not explode, a shaky or leaky toilet can definitely cause headaches (and puddles). However, fixing it doesn't have to be a stress-inducing chore. Replacing a toilet flange—a key component that connects your toilet to the drainpipe—is a manageable task that can save you from costly repairs. Whether you're a DIY enthusiast or a homeowner tackling this for the first time, this guide will empower you with the knowledge and confidence needed to switch out that old flange like a seasoned pro.
The Importance of a Toilet Flange
You might be wondering what a toilet flange really does. In simple terms, a toilet flange ensures that your toilet is securely connected to the floor and the drainpipe. It prevents wobbling and leaking, and it's vital for maintaining proper sanitation in your bathroom. When a flange gets damaged or rusted, it can cause leaking at the base of your toilet, lead to unpleasant odors, and even cause structural damage to your floor.
Recognizing the Signs of a Faulty Flange
Before you dive into the mechanics, it’s essential to determine whether your toilet flange needs changing. Here are some signs to look out for:
- Wobbling or rocking: If the toilet rocks when you sit on it, the flange might be broken or loose.
- Water pooling at the base: Persistent water at the toilet base could indicate a flange issue.
- Unpleasant odors: Sewage smells are a sure sign something is amiss.
- Visible rust or breakage: Sometimes, the flange is visibly damaged.
Being aware of these indicators will help you plan your repair without any unexpected surprises.
Gather Your Tools and Materials
Before jumping into the repair, ensure you have all the necessary tools and supplies. Here’s a handy list to get you started:
- Wrench
- Screwdriver
- Putty knife
- Flange repair kit or a new flange
- Wax ring or a wax-free seal
- Disposable gloves
- Towels or rags
- Bucket
- Safety goggles
Having these tools ready before you start means fewer interruptions and a smoother process overall.
Step-by-Step: How to Replace a Toilet Flange
🛠️ Step 1: Prepare Your Space
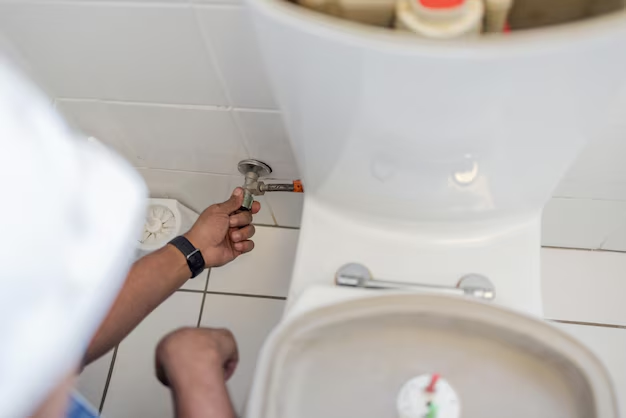
- Turn off the water supply: Locate the shut-off valve behind your toilet and turn it clockwise to shut off the water.
- Flush and drain: Flush the toilet to empty the water from the tank. Use the towels or rags to soak up any remaining water in the toilet bowl.
- Remove the toilet: Unscrew the nuts securing the toilet to the floor. Carefully lift the toilet and place it on a towel to avoid scratching the floor.
🧽 Step 2: Remove the Old Flange
- Inspect the flange: Remove any wax or residue around the old flange using a putty knife.
- Unscrew the flange: Use a screwdriver or wrench to remove the screws holding the flange in place. If it’s glued, you might need a hammer and chisel to break it free.
🔄 Step 3: Install the New Flange
- Select the right flange: Make sure you have the correct size for your replacement. Universal flanges are available if you're unsure.
- Position the new flange: Place the new flange over the drainpipe, ensuring it sits flush with the floor.
- Secure the flange: Fasten the flange using screws. Ensure it’s tightly secured to avoid any movement.
💦 Step 4: Attach a New Wax Ring
- Install the wax ring: Place a new wax ring on the flange. Alternatively, you can opt for a wax-free seal for a cleaner option.
- Reposition the toilet: Carefully lift and align the toilet over the flange. Press down to ensure a solid fit onto the wax ring.
🔧 Step 5: Reassemble and Test
- Secure the toilet: Tighten the nuts onto the bolts to hold the toilet in place. Avoid over-tightening as it can crack the porcelain.
- Reconnect the water: Turn the shut-off valve counterclockwise to restore water flow. Flush to ensure everything is working.
Common Pitfalls and How to Avoid Them
- Using the wrong tools can lead to stripped screws or bolts. Double-check your toolset before starting.
- Not sealing properly: Make sure the wax ring is firmly sealed to prevent leaks.
- Rushing the job: Take your time, especially when aligning the toilet. Misalignment can cause leaks and wobbles.
Tips for Ensuring a Long-Lasting Flange
- Regular inspection: Periodically check for any signs of wear.
- Clean properly: Keep the area around the base of your toilet clean and dry.
- Consider materials: Durable materials like PVC can provide longer-lasting performance.
Visual Guide: The Essentials at a Glance 📝
Here’s a quick recap with key points outlined for easy skimming:
- 🔧 Tools Needed: Wrench, screwdriver, putty knife, flange kit, wax ring, gloves.
- ❗ Signs of Damage: Rocking toilet, water pooling, sewer smells, visible damage.
- 🔄 Replacement Steps:
- Turn off water.
- Remove old flange.
- Install new flange.
- Secure with wax/seal.
- Test installation.
- ⚠️ Avoid Pitfalls: Use correct tools, ensure proper sealing, take your time.
Empowering Your Home Repair Skills
Replacing a toilet flange can seem daunting, but with the right tools and a calm approach, it’s quite achievable. By tackling this project yourself, not only do you save money on professional service fees, but you also gain valuable home maintenance skills that boost your confidence in handling future repairs. Next time your toilet acts up, you’ll know exactly what to do. Happy fixing!
Related Topics
- How Can I Change Text Message To Imessage
- How Can You Change a Jpeg To a Pdf
- How Do I Change a Jpeg To a Pdf
- How Do I Change a Pdf To a Jpg
- How Do I Change a Pdf To a Word Document
- How Do I Change a Repeating Decimal To a Fraction
- How Do I Change a Text Message To An Imessage
- How Do I Change From Text To Imessage
- How Do I Change Lowercase To Uppercase In Word
- How Do I Change My Political Party To Independent
