Mastering Home Improvements: Easily Change an Electrical Outlet
We use electrical outlets every day, powering our devices and appliances without giving them much thought. But when it comes time to replace an old, malfunctioning, or outdated outlet, many homeowners feel uncertain about the process. Fortunately, changing an outlet is a manageable task for DIY enthusiasts with the right tools and knowledge. Embarking on this small home improvement project not only enhances your electrical safety but also boosts your confidence for future endeavors.
In this guide, we’ll walk you through the steps to change an outlet, discuss the tools you’ll need, and provide tips to ensure a smooth and safe process. Let's dive into the details and empower you to tackle this project with ease.
Why Change an Electrical Outlet?
Safety Concerns
Old or damaged outlets can pose significant safety risks, including potential electrical fires. Over time, they may become loose, stop providing a stable connection, or even produce sparks. Addressing these issues sooner rather than later can prevent hazards.
Improved Aesthetics
Installing new outlets can refresh your space's look, especially if you upgrade to modern models with sleek designs or additional functionalities, like USB ports.
Increase Functionality
Upgrading outlets can increase functionality by adding smart home capabilities or simply ensuring that they meet the power needs of your new gadgets and appliances.
Tools and Materials You’ll Need
Before you start, gather these essential tools and materials:
- Screwdriver set (flathead and Phillips)
- Voltage tester or multimeter
- Wire stripper
- Pliers
- Replacement outlet
- Outlet cover plate
- Electrical tape
Having these tools on hand will make the process smoother and safer. They are essential for measuring voltage, disconnecting wires, and securing the new outlet in place.
Step-by-Step Guide to Replacing an Outlet
Step 1: Ensure Power is Off
⚠️ Safety First: Always ensure that power to the outlet is turned off. Go to your home's circuit breaker panel and switch off the circuit breaker controlling the outlet.
Step 2: Test the Current
Use a voltage tester or multimeter to verify that the power is off. Insert the tester into the outlet to ensure there is no electrical current.
Step 3: Remove the Outlet Cover
Unscrew and remove the faceplate from the outlet. Keep the screws stored safely so you can use them later.
Step 4: Unscrew the Old Outlet
Unscrew and carefully pull out the existing outlet to expose the wiring. Take note of how the wires are connected, as you'll need to replicate this for the new outlet.
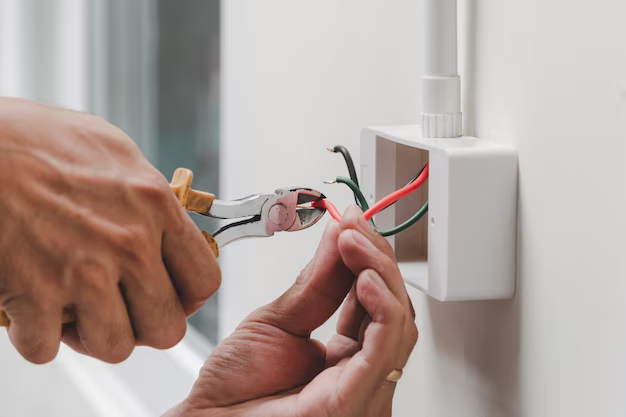
Step 5: Disconnect the Wires
Using a screwdriver, loosen the terminal screws and disconnect the wires from the old outlet. Typically, outlets have three types of wires: hot (black), neutral (white), and ground (green or bare copper). Label the wires if you're worried about forgetting which is which.
Step 6: Connect the New Outlet
Prepare the New Outlet: If your new outlet requires special features or modifications, ensure you follow any specific configurations provided with the purchase.
Attach the Wires: Connect the hot, neutral, and ground wires to the corresponding terminals on the new outlet. Securely tighten each screw to ensure a solid connection. Prevent wire exposure outside the terminal to avoid accidental shocks.
Secure Connections: Use electrical tape to cover the wire connections for added safety.
Step 7: Install the New Outlet
Carefully place the new outlet into the outlet box, ensuring no wires are pinched. Fasten it securely with the mounting screws.
Step 8: Replace the Outlet Cover
Screw the faceplate back on. Ensure there are no gaps between the plate and the wall.
Step 9: Restore Power and Test
Go to your circuit breaker panel and turn the circuit back on. Test the outlet with the voltage tester to confirm it's live and functioning correctly.
Common Issues and Troubleshooting
Outlet Not Functioning
- Check Connections: Double-check all wire connections if the outlet doesn’t work after restoring power.
- Test the Breaker: Make sure the breaker hasn’t tripped.
Outlet Sparking
- Double-Check Wiring: Re-examine connections for loose screws or wires.
- Consider Professional Help: If the outlet continues to spark, a professional electrician may be able to diagnose deeper electrical issues.
Safety Tips During Installation
- Avoid Metal Jewelry: Rings or bracelets can increase electrical shock risk.
- Use Insulated Tools: Opt for tools with insulated handles to minimize shock risk.
- Work in Adequate Lighting: Ensure the area is well-lit to easily see wires and connections.
Advantages of Upgrading to Smart Outlets
Enhanced Control
With smart outlets, you can control devices from your smartphone, setting schedules and automating power usage.
Energy Efficiency
Monitor energy consumption and potentially reduce utility bills by eliminating phantom energy usage.
Additional Features
Smart outlets often integrate with voice assistants, making them a convenient choice for modern homes.
Summary Table: Quick Tips for Changing an Outlet
| Task | Considerations | Tips |
|---|---|---|
| Disconnect Power | Essential for safety | Double-check breaker is off 🚫 |
| Use a Voltage Tester | Confirms no electricity flow | Always test before touching wires 🔌 |
| Label Wires | Avoid confusion during installation | Label each wire as you disconnect 🔖 |
| Secure Connections | Loose wires cause malfunctions 🔧 | Use electrical tape for safety |
| Test After Installation | Verifies proper operation | Test with a device or voltage tester ✔️ |
Embarking on a project like changing an electrical outlet may seem intimidating at first, but by following these steps, using the right tools, and understanding safety protocols, you can successfully manage the task. Safe and efficient, this process enhances your home's safety and functionality, paving the way for more ambitious and rewarding DIY projects in the future.
Related Topics
- How Can I Change Text Message To Imessage
- How Can You Change a Jpeg To a Pdf
- How Do I Change a Jpeg To a Pdf
- How Do I Change a Pdf To a Jpg
- How Do I Change a Pdf To a Word Document
- How Do I Change a Repeating Decimal To a Fraction
- How Do I Change a Text Message To An Imessage
- How Do I Change From Text To Imessage
- How Do I Change Lowercase To Uppercase In Word
- How Do I Change My Political Party To Independent
